No products in the cart.
The Shock-Absorbing Blade fits any figure skating boots and is easy to mount.
We recommend professional skate technician assistance with mounting figure skating blade correctly.
Follow the four-step mounting guide below.
Place the blade on the boot and determine the desired position of the blade. Do not remove the plastic strips securing the blade.
If there's a gap between the blade frame's mounting plate and the boot, the shock-absorbers will naturally adapt for a perfect fit once the screws are in place. Do not insert any objects between the blade and the boot.
Mark the adjustment holes (oval slots) and drill the screw holes. Follow the instructions of the boot manufacturer for drilling the holes.
For temporary mounting, secure the blade using two screws in the front and three screws in the rear frame. Use only the screws provided by the boot manufacturer.
Check the straightness of the blade and make adjustments if necessary. Once the skater is satisfied, drill and add more screws to further secure the blade to the boot.
For permanent mounting, always use a minimum of five screws in the front and three screws in the rear section for secure mounting.
Once the Shock Absorbing Blade is mounted on the boot, cut off the black plastic strips and remove the gray inserts from the holes in the blade-runner to activate the cushioning.
For the Single Cushioning configuration, there is only one gray insert in the heel to be removed.
Once the blade is permanently mounted, if the shock absorbers feel loose, secure their position by tightening the screws in the pins with the provided hex key. For Dual Cushioning, tighten all pins; for Single Cushioning, only tighten the heel pins.
Repeat this process until the shock-absorbers are firmly seated in the blade assembly and cannot be moved by hand, usually requiring 3-6 passes with the hex key in clockwise direction. Periodically check the shock-absorbers and re-perform this step if they feel slightly loose. Be cautious not to overtighten the screws in the pins.
Tightening: Turn the screw in the pin clockwise.
Release: Turn the screw in the pin counter-clockwise.
For a visual guide, watch a short video.
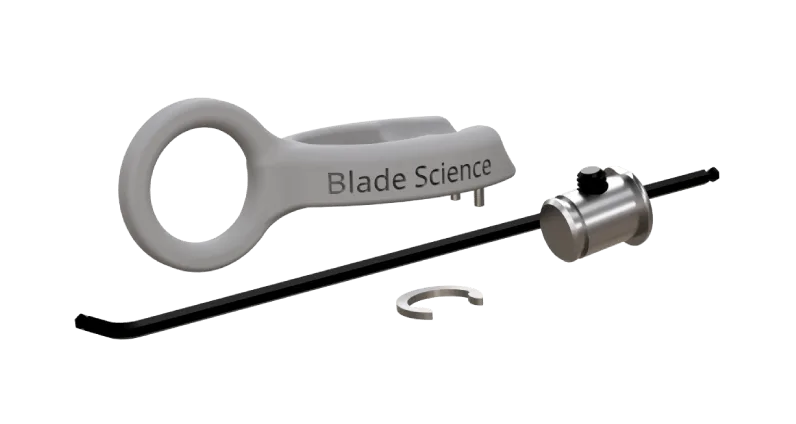
Position the screw inside the pins to a neutral state using the provided hex key by turning it counter-clockwise until the screw aligns with the pin. Ensure that the screw does not protrude from the pin and do not remove the screw from the pin.
Remove the rings from the pins using the supplied tool then push the pins out from the blade.
You can now change the blade-runner and shock-absorbers. Position the new shock-absorbers or blade-runner in the frame. Refer to the example picture for correct placement.
To secure the blade-runner gently push the pins (highlighted in blue) back into the frame. Ensure the path for the pin is clear. Begin with the front pin, then proceed with the rear pin. Ensure the pin's head fits into the frame. Once the pin is fully in the frame, secure it with the ring from the opposite side (highlighted in blue).
If the blade-runner gets in the way of the pin's path, partially unscrew the rear frame from the boot to create some slack. Adjust the frame so that the path for the pin is clear, allowing you to push the pin through into the frame.
Once the pins are secured, proceed to step 4 (mounting), which involves securing the shock-absorbers using the provided hex key, 3-6 passes in clockwise direction.